Showing posts with label diy. Show all posts

13 Dec 2013

Secret Santa Gifts that Kids Can Make themselves

My son's Year 2 teacher this year decided the class would do a Secret Santa, but with a twist. The kids had to make their gifts. There was to be a boys gift and a girls gift. Boys make for boys, girls make for girls and then it would be lucky dip on the last day of school.

The lucky dip bit threw me a bit - it was hard to know what to make when you didn't know who would be getting it. So I figured the way to a man's heart is through his stomach so let's bake something.


It was also a project I knew my son could be involved in. So we baked some simple vanilla cookies and before baking studded them with red and green M&M's. We then baked them, and once cooled pack them in a plastic bag tied with ribbon. It was an easy and effective gift that the recipient loved! We also packed up the leftover ones and gave them out to all the boys' cousins.


Next I'll show you some simple Teacher's Gifts.

10 Dec 2013

Easy Christmas Gifts that kids can make for their friends

Every year my kids love to write Christmas Cards to all the friends in their class. Most kids also include a candy cane or chocolate santa in with their cards. This year with two boys at school we need 52 gifts to make sure every child in each class got one.


So I decided to do something a bit different. My son had learnt at school how to make his own sherbet. So we set about making green and red sherbet. If you need a sherbet recipe click here.

We then packaged the sherbet into tiny clip seal plastic bags and included a green or red lollipop for dipping! We tied the whole lot together in a plastic bag with ribbon and attached a mailing label to each one.

On the mailing labels we decorated one side with washi tape and the other side I print out little messages to stick on each one. The message read:


Here's some Yummy Elf Dust,
To spread the Christmas Cheer,
And say thank you for being my friend,
Throughout our first Prep year.
(or other variation "throughout our Year 2 year")

Love from Charlie.

This was a really simple gift, but was much more personal than store bought cards and candy canes.

Next time I'll show you an easy Secret Santa gift.


9 Oct 2013

Aqua and Cream Burlap Tote for handmade swap

It's swap time again and this time my recipient had Aqua and White as her favourite colours. Luckily I had just the perfect printed burlap to make her a gorgeous tote for summer.

I was in such a hurry to get it made and sent out, that I completely forgot to take photos along the way. So I will make another one soon and post the tutorial then.

Printed burlap is such a great way to add wow to a simple burlap tote. There are so many designs available in printed burlap in the major fabric stores at the moment I would highly recommend experimenting with it to create a perfect summer beach tote!

I hope Jo enjoys her new tote as much as I enjoyed making it!

3 Oct 2013

Heart Shaped Pocket Warmers Tutorial

A couple of weeks ago I shared with you my heart shaped pocket warmers which I made for Mary for the last Handmade Swap I participated in. Even though Spring has sprung here in Australia, I thought these might come in handy for those of you in the Northern Hemisphere who are just about to embark on your cool season.

So here is the tutorial of how I made them:
  1. Cut two heart shapes out of felt. I used a printed felt for the front and a solid yellow for the back.

30 Aug 2013

Presents in the Post! The Handmade Swap

Last week I received the best present in the mail. It was my gift for The Handmade Swap. I was so excited to open it. Chris made me the most gorgeous apron, which will match perfectly with my new kitchen. Thankyou so much Chris!


If your not a member of The Handmade Swap and you would like to join and send and receive Handmade Gifts 5 times a year, you can join here.

23 Aug 2013

My Swap Goodies! Ready to go for The Handmade Swap!

It's been a busy few weeks with the Ekka and getting ready for my first swap in The Handmade Swap. The Handmade Swap is an organised craft swap in Australia where members send each other Handmade Gifts 5 times a year. It's really cool and lots of fun.

So this swap I had to send something to Mary who lives on farm and loves bright colours. So made her all these goodies and sent them off.


2 Aug 2013

Final Ekka Entry! Baby Burlap Doll Travel Cradle

Here is the last of my entries for the Ekka craft competition this year. For the Childrens Toy section I have made a Baby Burlap Doll Travel Cot.

19 Jul 2013

Entries for the Royal Show

Tis that time of year again in Brisbane when the Ekka comes to town. The Ekka is the Agricultural Show when 'country comes to the city'. It's also the most competitive show in the State for Crafters. This year I've opted to enter three categories:

  • Funky Fabrics and Wearable Art
  • Christmas Decorations 
  • Childrens Toy
And for once, I'm actually somewhat organised.

So I thought I would share with you what I am making. The first is the Christmas decorations. Given many people celebrate 'Christmas in July' now is a good time to share with you my Burlap Christmas Trees.

Here's the final product:


If I were displaying them around the home, I would probably sit them on top of wine or champagne glasses at varying heights, but for now, they are just sitting on the table.

To make, they are really simple. Take a large sheet of cardboard (I used old manilla folders) and roll them around using one corner as the point to form a cone shape.


30 May 2013

Lorax themed 5th Birthday Party - A Burlap Picnic in the Park

As I said April is birthday month in our house, so I thought I would share with you some of the highlights of my 5 year olds Lorax themed birthday party.


We had the party in the park after school. Before the children arrived we set up some tables for food and party bag goodies. We also set up a large picnic rug for the kids to enjoy their afternoon tea on. As usual Burlap abounds in our house, so we recycled the Burlap we used for the smash cake back drop the week before, and laid it down as the picnic area. Then created a table runner out of another length of printed burlap with a crazy red chevron print which looked like a graphic from a Dr Seuss Book! We also hung tissue paper pompoms from the tree over the picnic area.

15 May 2013

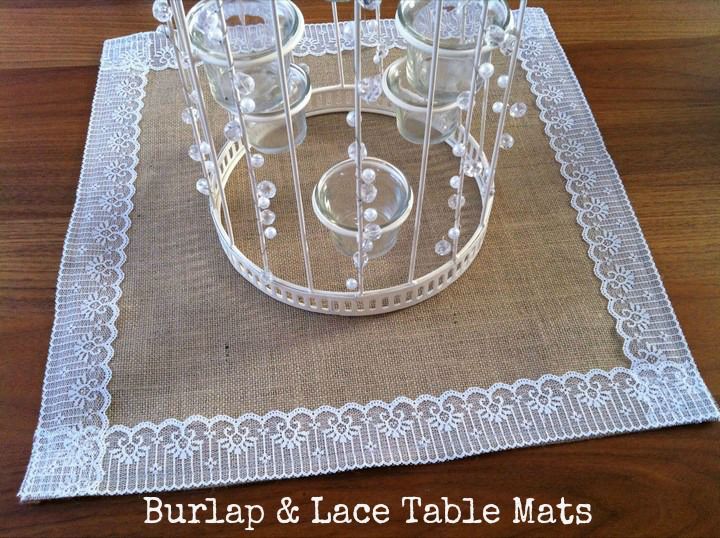
Burlap and Lace Table Mats make Perfect Wedding or High Tea Decor

Burlap and Weddings just seem synonymous these days! Burlap just lends itself so well to wedding decor as it is a perfect pairing for white.

Kelly over at Boho Weddings recently featured a tutorial by Becki (a self confessed Boho Bride) for these gorgeous table centrepiece mats.


The table mats are made from Burlap and Lace and are so simple to make. To see the tutorial head over to Boho Weddings where Becki shows you the easy step by step instructions.


They are so simple and yet so beautiful. I think they would be lovely on wedding tables but also for a special high tea or baby shower as well. If you need an elegant touch for your table decor these table mats are perfect.

23 Apr 2013

Bendable Burlap Flowers

Well it's been almost 4 weeks now since our phone line went down, and our Telco has just fixed it. No phone line, no broadband, no blogging. So in lieu of being able to blog I have spent some time recently in the studio creating numerous things which I will share with you over the coming weeks.

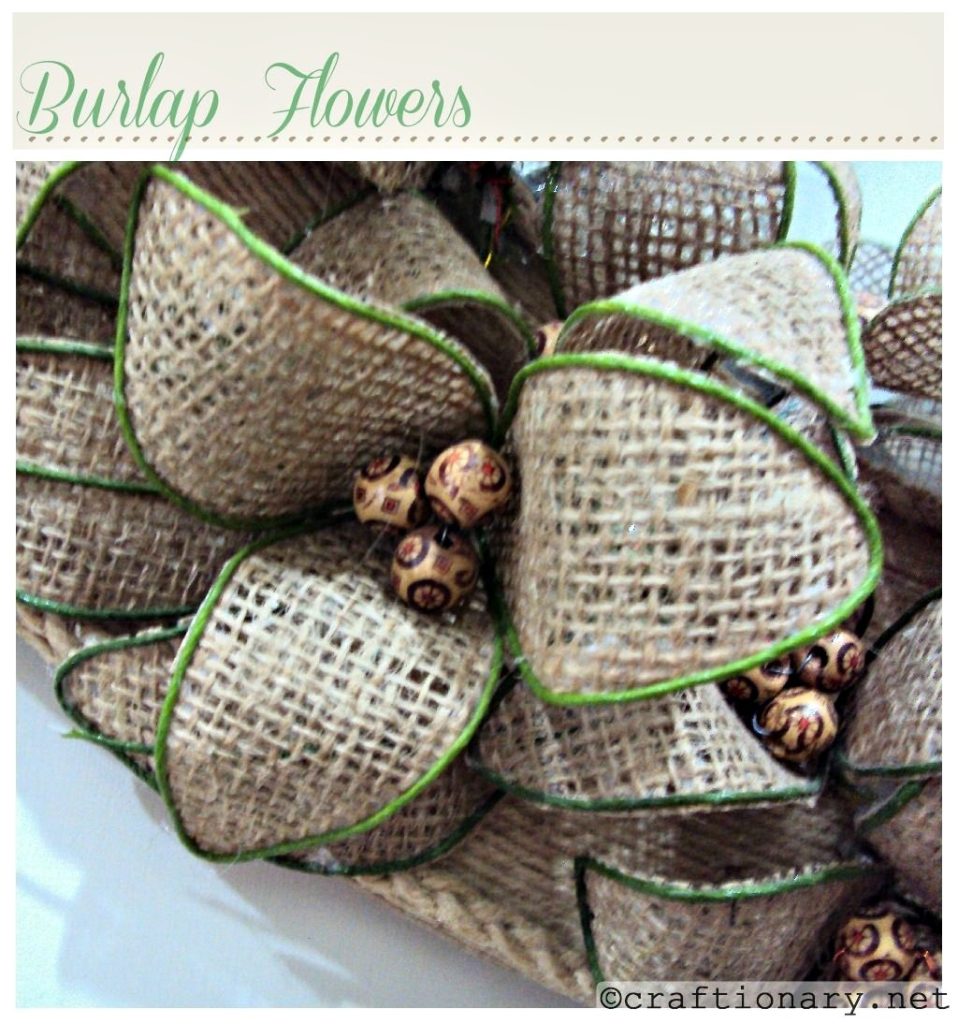
But to get things up and running again I would like to share with you these gorgeous bendable Burlap Flowers I found on Hani's Blog (before loss of Internet connection!).


Hani over at Craftionary created these beautiful Burlap Flowers. The great thing is, she has used wire to give them structure so you can bend them into all sorts of realistic positions. If you want to get the low down on how to make these gorgeous flowers head over to Craftionary where Hani shares a really simple step step guide on how to create these gorgeous flowers.

Her cousin has used them to decorate a wreath, which looks fabulous. I'm also thinking unique wedding bouquet. So many uses for these flowers!

22 Mar 2013

Easter Egg Lavender Sachets - An alternate Easter gift

With Easter fast approaching, Burlap comes into it's own. Burlap is the king of Easter. What could be a better fabric to celebrate Spring, Nature and New Life than Burlap. Not to mention the meaning of Lent and going without, the humble Burlap fabric is the perfect companion.
Easter Egg Burlap Lavender Sachets
Burlap Lavender Sachets are the perfect gift when you don't want to give chocolate for Easter. These sweet little sachets can be hung in the wardrobe to keep your clothes smelling fresh and bug free all year round - and best of all not a calorie to be seen!

24 Feb 2013

Burlap Doily Bunting

A great tutorial on a really easy to making Burlap Bunting.

Kelli and Kristi from Lolly Jane blog have created the most darling Burlap Bunting I have ever seen. I just had to share it with you. I wish I had a little girls room to decorate....


Pop on over to Lolly Jane to get the full details on the 'how to' create this really sweet bunting. It's really simple but oh so effective. Be sure to browse around whilst your there, these ladies are really talented!

Whilst I was there I noticed they have also created a special St Patricks Day bunting!


I think by combing the technique of the doily bunting with the design of the St Patricks Day one, you would end up with the perfect St Patricks Day decoration. So with St Patricks Day just around the corner on March 17th, this could be the perfect St Patricks Day craft to create a very simple but effective St Patricks Day decorations. I think I've found my St Patricks Day decoration for 2013.

I will post my results shortly.


17 Dec 2012

Burlap Christmas Gift Tags

Things have been a little slow on the blogging front lately as all my attention has been turned to my new studio. Hopefully, all fingers crossed, it will be ready for Christmas and be the best Christmas present ever!

So my Burlap adventures have been curbed somewhat, however I couldn't resist a little burlap for Christmas.

This year I decided to go with brown paper packaging tied up with string (these are a few of my favourite things!). So for the gift tags I made some simple Burlap tags.


Here's the how to:

Cover a piece of A4 cardboard with spray adhesive and lay your burlap over the top. I then placed a piece of baking paper over the top and weighted the burlap down to make sure it sticks. I used a box of champagne bottles - after all it is Christmas time!


11 Oct 2012

DIY tutorial for Jute Webbing Flowers

Here is the DIY tutorial I promised on how to make a Jute webbing Rose. 


Sewing the roses out of webbing means it's quick and simple as there is no fraying to worry about. I used about 50cm of webbing to make this one flower, so it is also economical.

It's easier to show you than explain it, so I have attached the video link below.

These Webbing Roses are easy to make and are perfect for embellishing your Burlap Projects. I have used them on the Silverware Caddy but you could also use them as part of a Burlap Wedding Bouquet.

6 Oct 2012

Silverware Caddy Tutorial

I recently stopped by the lovely Mary Beth's Blog Cupcakes and Crinoline. She had created the most delightful Silverware Caddy. 


Mary Beth lined a metal tub with some Burlap to safely store her Silverware in. I just fell in love immediately. To get the low down on how to create your own follow this link to her tutorial.

Inspired by her tutorial I set out to create my own.

27 Sept 2012

Sweetest Burlap Ring Cushion

I don't know why, but lately I seem to noticing the coolest DIY Burlap Projects for Weddings! I wish I had of seen them before I got married, I would have had a Burlap Wedding for sure.

Anyway, browsing out there in the Internet this week I noticed this great little DIY tutorial from Ruffled for this gorgeous Burlap Ring Pillow. Click the link to see the full DIY tutorial.


Isn't it just the cutest thing?

I would love to hear about any other cute Burlap Wedding Ideas you may have and feature them on this blog. Leave a comment with your ideas.