A great idea for a fast, easy and cost effective gift is a Burlap Door Stop. Last week was my Mothers Birthday, and the problem I have every year is what do you buy for someone who has everything? So usually I end up making some unique creation which I know she can't buy anywhere else. So this year I decided to give her a Burlap Door Stop perfect to use for the doors opening to her newly rennovated outdoor room.
Here's how I made it.
Materials:
Burlap
Contrasting Fabric (I used an upolstery remant, but cotton or polyester would also work well)
Ribbon for tag
Ziplock Bag
Sand
General Sewing Supplies
First I created my pattern by drawing a 15cm by 15cm square for the base. I cut two of these out of Burlap as I wanted the base to have extra reinforcement so it is two layers. Then I drew a horizontal line 15cm long. Then at the midpoint (7.5cm) I drew a vertical line 15cm long. And then joined the top midpoint to the two edges of the horizontal line to form a triangle. This sounds more complicated than it is - see photo for example.
I then cut two triangles out of Burlap and two out of Cotton.
To assemble I first pinned each of the triangles to one edge of the (double layer) Burlap square, and stitched in place.
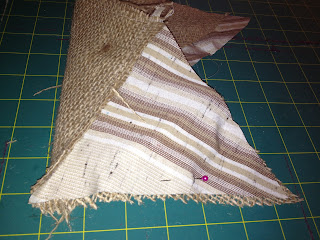
Then opening out the triangles, I then joined the long edges of the triangles together. To do this fold the square in half to form a triangle shape, and align two edges of the triangles. Stitch in place. Do this for three sides leaving the fourth side open.
I also inserted a tag to make it easier to pick up the Door Stop. To this I folded 10cm of ribbon in half and inserted in between the two edges of one side of the triangles, so the ribbon fold was inside the triangle, before I stitched in place.
Then I turned the door stop right way out and inserted a zip lock bag full of sand.
I then folded in the side seams and slip stitched in place with a needle and thread.
I then gift wrapped it ready for Mum for her Birthday. An easy and original gift that I know she won't already have.
If you would like to watch a video to guide you with the step by step instructions on how to make your own Burlap Bag Door Stop then follow this link:
http://www.youtube.com/watch?v=T82GwoPYysc&feature=plcp
 |
| The Finished Door Stop |
Here's how I made it.
Materials:
Burlap
Contrasting Fabric (I used an upolstery remant, but cotton or polyester would also work well)
Ribbon for tag
Ziplock Bag
Sand
General Sewing Supplies
First I created my pattern by drawing a 15cm by 15cm square for the base. I cut two of these out of Burlap as I wanted the base to have extra reinforcement so it is two layers. Then I drew a horizontal line 15cm long. Then at the midpoint (7.5cm) I drew a vertical line 15cm long. And then joined the top midpoint to the two edges of the horizontal line to form a triangle. This sounds more complicated than it is - see photo for example.
I then cut two triangles out of Burlap and two out of Cotton.
 |
| Final Cut pieces |
 |
| Stitching each of the triangles around the four sides of the square |
 |
| Lining up the triangle edges ready for stitching |
 |
| Inserting the tag - I have folded back the hessian layer on top to show how the tag is inserted between the two layers |
 |
| With bag of sand inserted now align edges and slip stitch closed |
I then gift wrapped it ready for Mum for her Birthday. An easy and original gift that I know she won't already have.
If you would like to watch a video to guide you with the step by step instructions on how to make your own Burlap Bag Door Stop then follow this link:
http://www.youtube.com/watch?v=T82GwoPYysc&feature=plcp


Stopping by from the Small Blog Meet. What an original project! I haven't given burlap much thought, but as I love textiles in general... this is very interesting!
ReplyDeleteComing over from Lily's Quilts - Wow, I had never thought burlap could have so many uses! I love the rustic meets sophisticated look!
ReplyDelete